In case you missed it from the first post, in lieu of sew-along for the Stinger Dress and Top, I'm compiling all the most important information that you will need to make your own in a series of two blog posts.
Today it's time to talk cutting, sewing and construction.

The trick to cutting any slippery fabric is to have layers of paper. Head on over to this blog post where I detail the easiest method.
What tips do you have on sewing the front dart at the center front seam?:This little detailed area can make a big impact on the styling, but part of that detail is ensuring that the bust darts match at the center front. Here's how I made all the samples for the Stinger, complete with topstitching details:
1) On wrong side of the garment, sew the best darts and iron the darts down.
2) An optional detail is to do a topstitch around the shape of the folded dart. It just helps to make the dart stand out and gives your garment something unique. Left side shows the wrong side of the bodice and right side shows what it looks like on the outside.
3) On right sides and wrong sides, mark the 1/2" seam allowance at the dart.

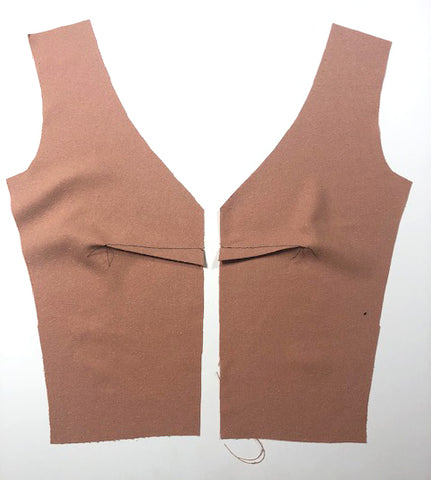
4) Position the front bodice pieces together at the center front, aligning from the dart first, then match the top and the bottom.
*note, for demonstration purposes, neckline trim was omitted. Please remember to include on your garment.

5) On the seam allowance mark, put a pin though all the layers.

6) Gently open the area pinned to ensure the dart seams are aligned. If it is off, put the pin through the top layer then stick the pin end through the 1/2" mark on the opposite side, exactly where it should match. 
7) With right sides together, sew the center front bodice. The finished bodice should look similar to below.

The Stinger is heavy on the gathering. I don't know if this is anyone's fave task, but sometimes to get the look you gotta put in the work. Trust me though, it will be well worth it!
If you have a foot that can make the gathering automatically, that is awesome and I am jealous. However if you are like me and you have to do it by hand, here is my definitive guide for the easiest way to create gathers. The key to this method is to take your time to distribute all the fullness evenly. Your dress will look so much better for it.
Q: How do I make the Cuff for the sleeve view?:The cuff is basically a bias tape finish that holds all the gathers in place. Here is my breakdown of how it's done:
1) Add the gathering stitches to the bottom of the sleeve opening and gather until the finished length matches required measurement as labeled on sleeve for your size.

2) With right sides together, sew the sleeve inseam together.

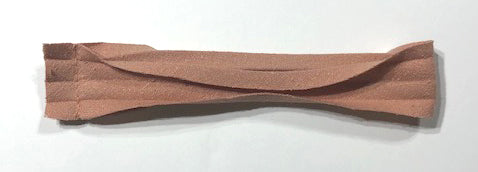
3) Take the cuff trim and fold in half so wrong sides are together. Iron flat.